分享目标
- 剖析自动化配置原理。
- 如何开发自己的自动化配置。
- 案例分析实践。
本篇建立在你已经会SpringBoot的基本使用上。
SpringBoot是你进阶掌握SpringCloud的必须装备
配置标准化&外部化
1、统一配置文件名称
统一命名:application,支持properties\yml两种格式
2、配置属性支持继承,相同后者覆盖前者
application.yml
./config/application-.yml
# application.yml
spring:
  profiles:
    active: ${ENV:dev}
biguava:
  tags: it's me
  msg: hello world
---
spring:
  profiles: dev
biguava:
  tags: it's you
---
# 最终得到结果:
biguava:
  tags: it's you
  msg: hello world
方式一:单独一个 Model.class 文件
package com.ts;
/**
 * biguava配置
 */
@ConfigurationProperties(prefix = "biguava",ignoreInvalidFields = true)
public class Biguava {
	String tags;
	String msg;
	public void setTags(String tags){
		this.tags = tags;
	}
	public String getTags(){
		return this.tags;
	}
	...
}
方式二:直接在需要用个的地方使用@Value
@Configuration
public class BiguavaUtil{
	@Value("${biguava.tags}")
	String tags;
	@Value("${biguava.msg}")
	String msg;
}
3、激活profiles方式:
java -jar xxxx.jar --spring.profiles.active=dev,hsqldb --biguava.msg="just for test"
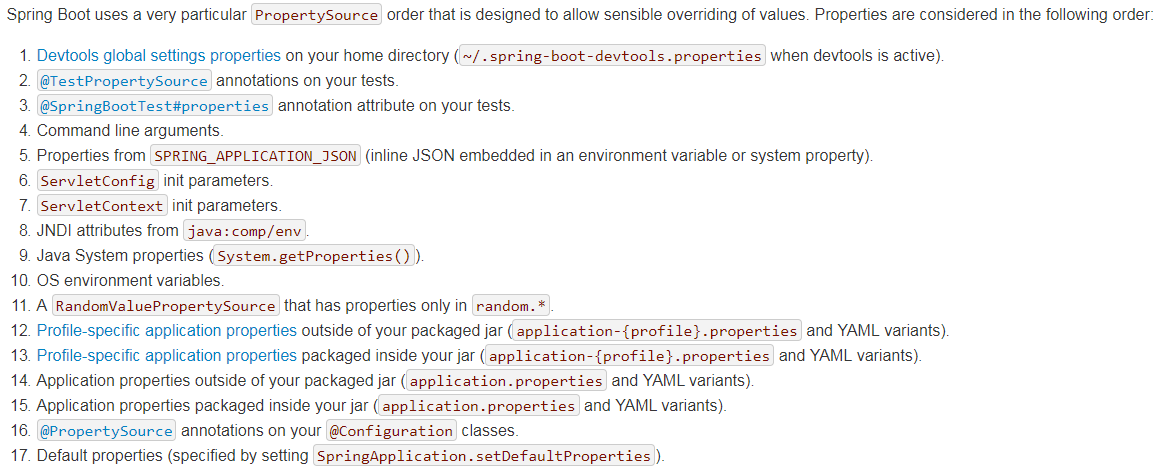
配置属性生效存在优先级(1-17:高-低):
Auto-configuration
1、自动配置启动流程
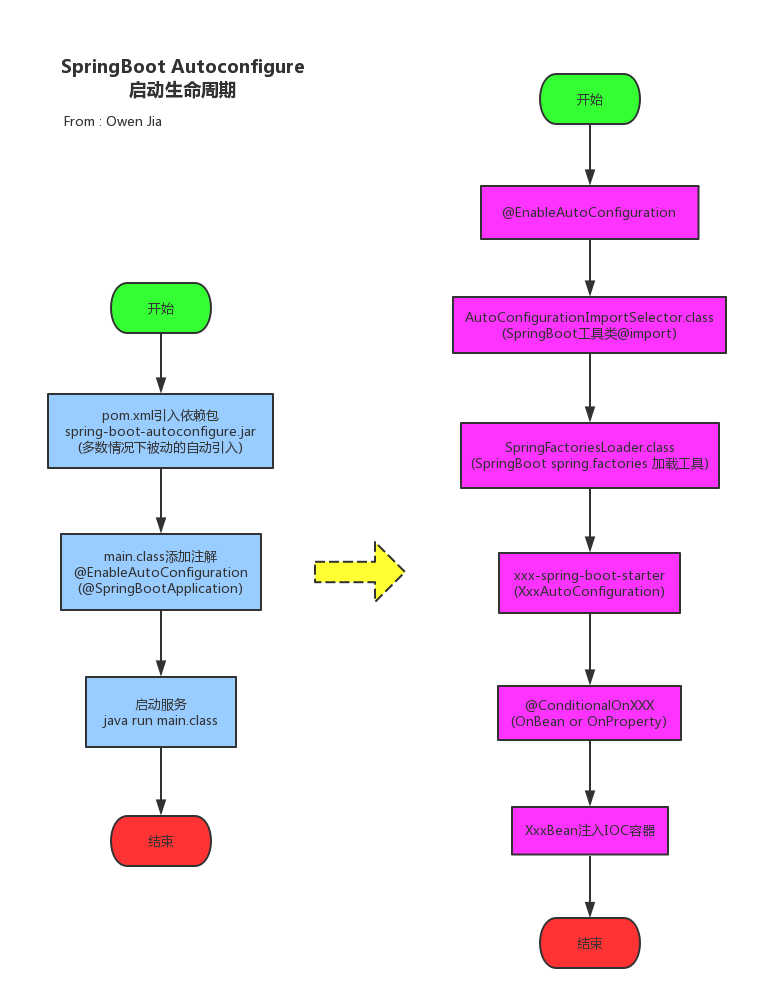
重要知识点:
- spring-boot-autoconfigur.jar 自动配置实现代码。
- @EnableAutoConfiguration 开启自动配置扫描。
- META-INF/spring.factories 启动扫描类清单文件。
- @Configuration&@ConditionalOnXXXX starter启动依赖条件,"ConditionalOnBean"。
- spring-boot-autoconfigure-processor.jar 自动生成metadata清单实现包。
- META-INF/spring-autoconfigure-metadata.properties 启动条件元数据清单。
部分源码(spring-boot-2.0.6)展示:
EnableAutoConfiguration.java
@Target({ElementType.TYPE})
@Retention(RetentionPolicy.RUNTIME)
@Documented
@Inherited
@AutoConfigurationPackage
@Import({AutoConfigurationImportSelector.class})
public @interface EnableAutoConfiguration {
    String ENABLED_OVERRIDE_PROPERTY = "spring.boot.enableautoconfiguration";

    Class<?>[] exclude() default {};

    String[] excludeName() default {};
}
@import:SpringIOC容器注入工具。
AutoConfigurationImportSelector:扫描jar内spring.factories文件。
SpringFactoriesLoader.class:factories清单加载实现类。
@Conditional: starter启动判断条件
搭建自己的starter
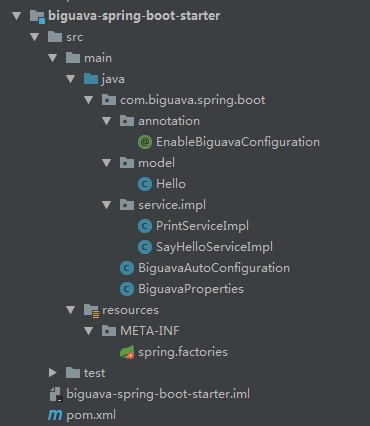
以biguava-spring-boot-starter项目(后面统称biguava)为例讲解。biguava属于bi-parent子项目,是以"自定义注解"和"bean启动条件"为原理来构建starter。
目录结构展示:
第一步:在pom.xml中引入spring-boot-autoconfigure-processor.jar。
<dependency>
	<groupId>org.springframework.boot</groupId>
	<artifactId>spring-boot-autoconfigure-processor</artifactId>
	<optional>true</optional>
</dependency>
processor在complie时它会自动生成spring-autoconfigure-metadata.properties。存放ConditionalOnClass启动依赖和出发条件清单,通过@AutoConfigureBefore、@AutoConfigureAfter来实现组件依赖。注意:要求关键字不要和官方相同。
spring-autoconfigure-metadata.properties
#Wed Oct 24 16:39:39 CST 2018
com.biguava.spring.boot.BiguavaAutoConfiguration=
com.biguava.spring.boot.BiguavaAutoConfiguration.Configuration=
第二步: 编写starter启动依赖@interface类。
EnableBiguavaConfiguration.class
/**
 * biguava启动注解
 * @author: Owen Jia
 * @time: 2018/10/23 18:12
 */
@Target({ElementType.TYPE})
@Retention(RetentionPolicy.RUNTIME)
@Documented
public @interface EnableBiguavaConfiguration {
}
第三步: 配置classpath:/META-INF/spring.factories。
spring.factories
# Auto Configure
org.springframework.boot.autoconfigure.EnableAutoConfiguration=\
com.biguava.spring.boot.BiguavaAutoConfiguration
第四步:编写具体业务实现。
PrintServiceImpl.class,根据配置周期打印时间sample。
/**
 * @author: Owen Jia
 * @time: 2018/10/3 14:13
 */
public class PrintServiceImpl {

    private boolean printEnabled = true;
    private int printCycleTime = 1;

    public void printTime(){
        try {
            while (printEnabled){
                Thread.sleep(printCycleTime * 1000);
                SimpleDateFormat sf = new SimpleDateFormat("yyyy-MM-dd HH:mm:ss");
                System.out.println("current time is " + sf.format(new Date()));
            }
        } catch (InterruptedException e) {
            e.printStackTrace();
        }
    }

    public boolean isPrintEnabled() {
        return printEnabled;
    }

    public void setPrintEnabled(boolean printEnabled) {
        this.printEnabled = printEnabled;
    }

    public int getPrintCycleTime() {
        return printCycleTime;
    }

    public void setPrintCycleTime(int printCycleTime) {
        this.printCycleTime = printCycleTime;
    }
}
第五步: 开发starter启动类。@ConditionalOnBean来控制starter启动,@EnableConfigurationProperties加载starter需要的配置属性,@Bean控制接口启动。
BiguavaAutoConfiguration.class
/**
 * 自动配置-配置类
 * ConditionalOnBean 通过判断EnableBiguavaConfiguration注解是否使用启动自动配置
 * @author: Owen Jia
 * @time: 2018/10/22 18:20
 */
@Configuration
@EnableConfigurationProperties(BiguavaProperties.class)
@ConditionalOnBean(annotation = EnableBiguavaConfiguration.class)
public class BiguavaAutoConfiguration {
    @Autowired(required = false)
    BiguavaProperties biguavaProperties;

    @Bean
    @ConditionalOnMissingBean(SayHelloServiceImpl.class)
    public SayHelloServiceImpl sayHelloService(){
        System.out.println("SayHelloService bean was matched");
        System.out.println("Execute Create New Bean: SayHelloServiceImpl");
        SayHelloServiceImpl sayHelloService = new SayHelloServiceImpl();
        sayHelloService.setBiguavaProperties(biguavaProperties);
        return sayHelloService;
    }

    @Bean
    @ConditionalOnProperty(prefix = "biguava.print",value = "enabled",matchIfMissing = true)
    public PrintServiceImpl printServiceImplByPro(){
        System.out.println("PrintServiceImpl:enabled= " + biguavaProperties.getPrint().isEnabled());
        System.out.println("Execute Create New Bean: PrintServiceImpl");
        PrintServiceImpl printService = new PrintServiceImpl();
        printService.setPrintCycleTime(biguavaProperties.getPrint().getCycleTime());
        printService.setPrintEnabled(biguavaProperties.getPrint().isEnabled());
        printService.printTime();
        return printService;
    }
}
第六步: 在main.class添加启动注解@EnableDubboConfiguration,在application-local.yml文件中添加biguava配置。
WebApp.class
/**
 * 服务启动入口
 * @author Owen Jia
 */
@SpringBootApplication
@MapperScan("com.jcc.bi.data.dao")
@ComponentScan(basePackages = "com.jcc.bi.*")
@EnableDubboConfiguration
@EnableBiguavaConfiguration
public class WebApp {

    public static void main(String[] args){
        SpringApplication app = new SpringApplication(WebApp.class);
        app.run(args);
    }
}
applicaiton-local.yml
# biguava组件配置
biguava:
  level: height
  monitorTime: 121
  hello:
    keys: 1234asdf
    desc: i am biguava sample
  print:
    enabled: true
    cycleTime: 5 # 单位:s
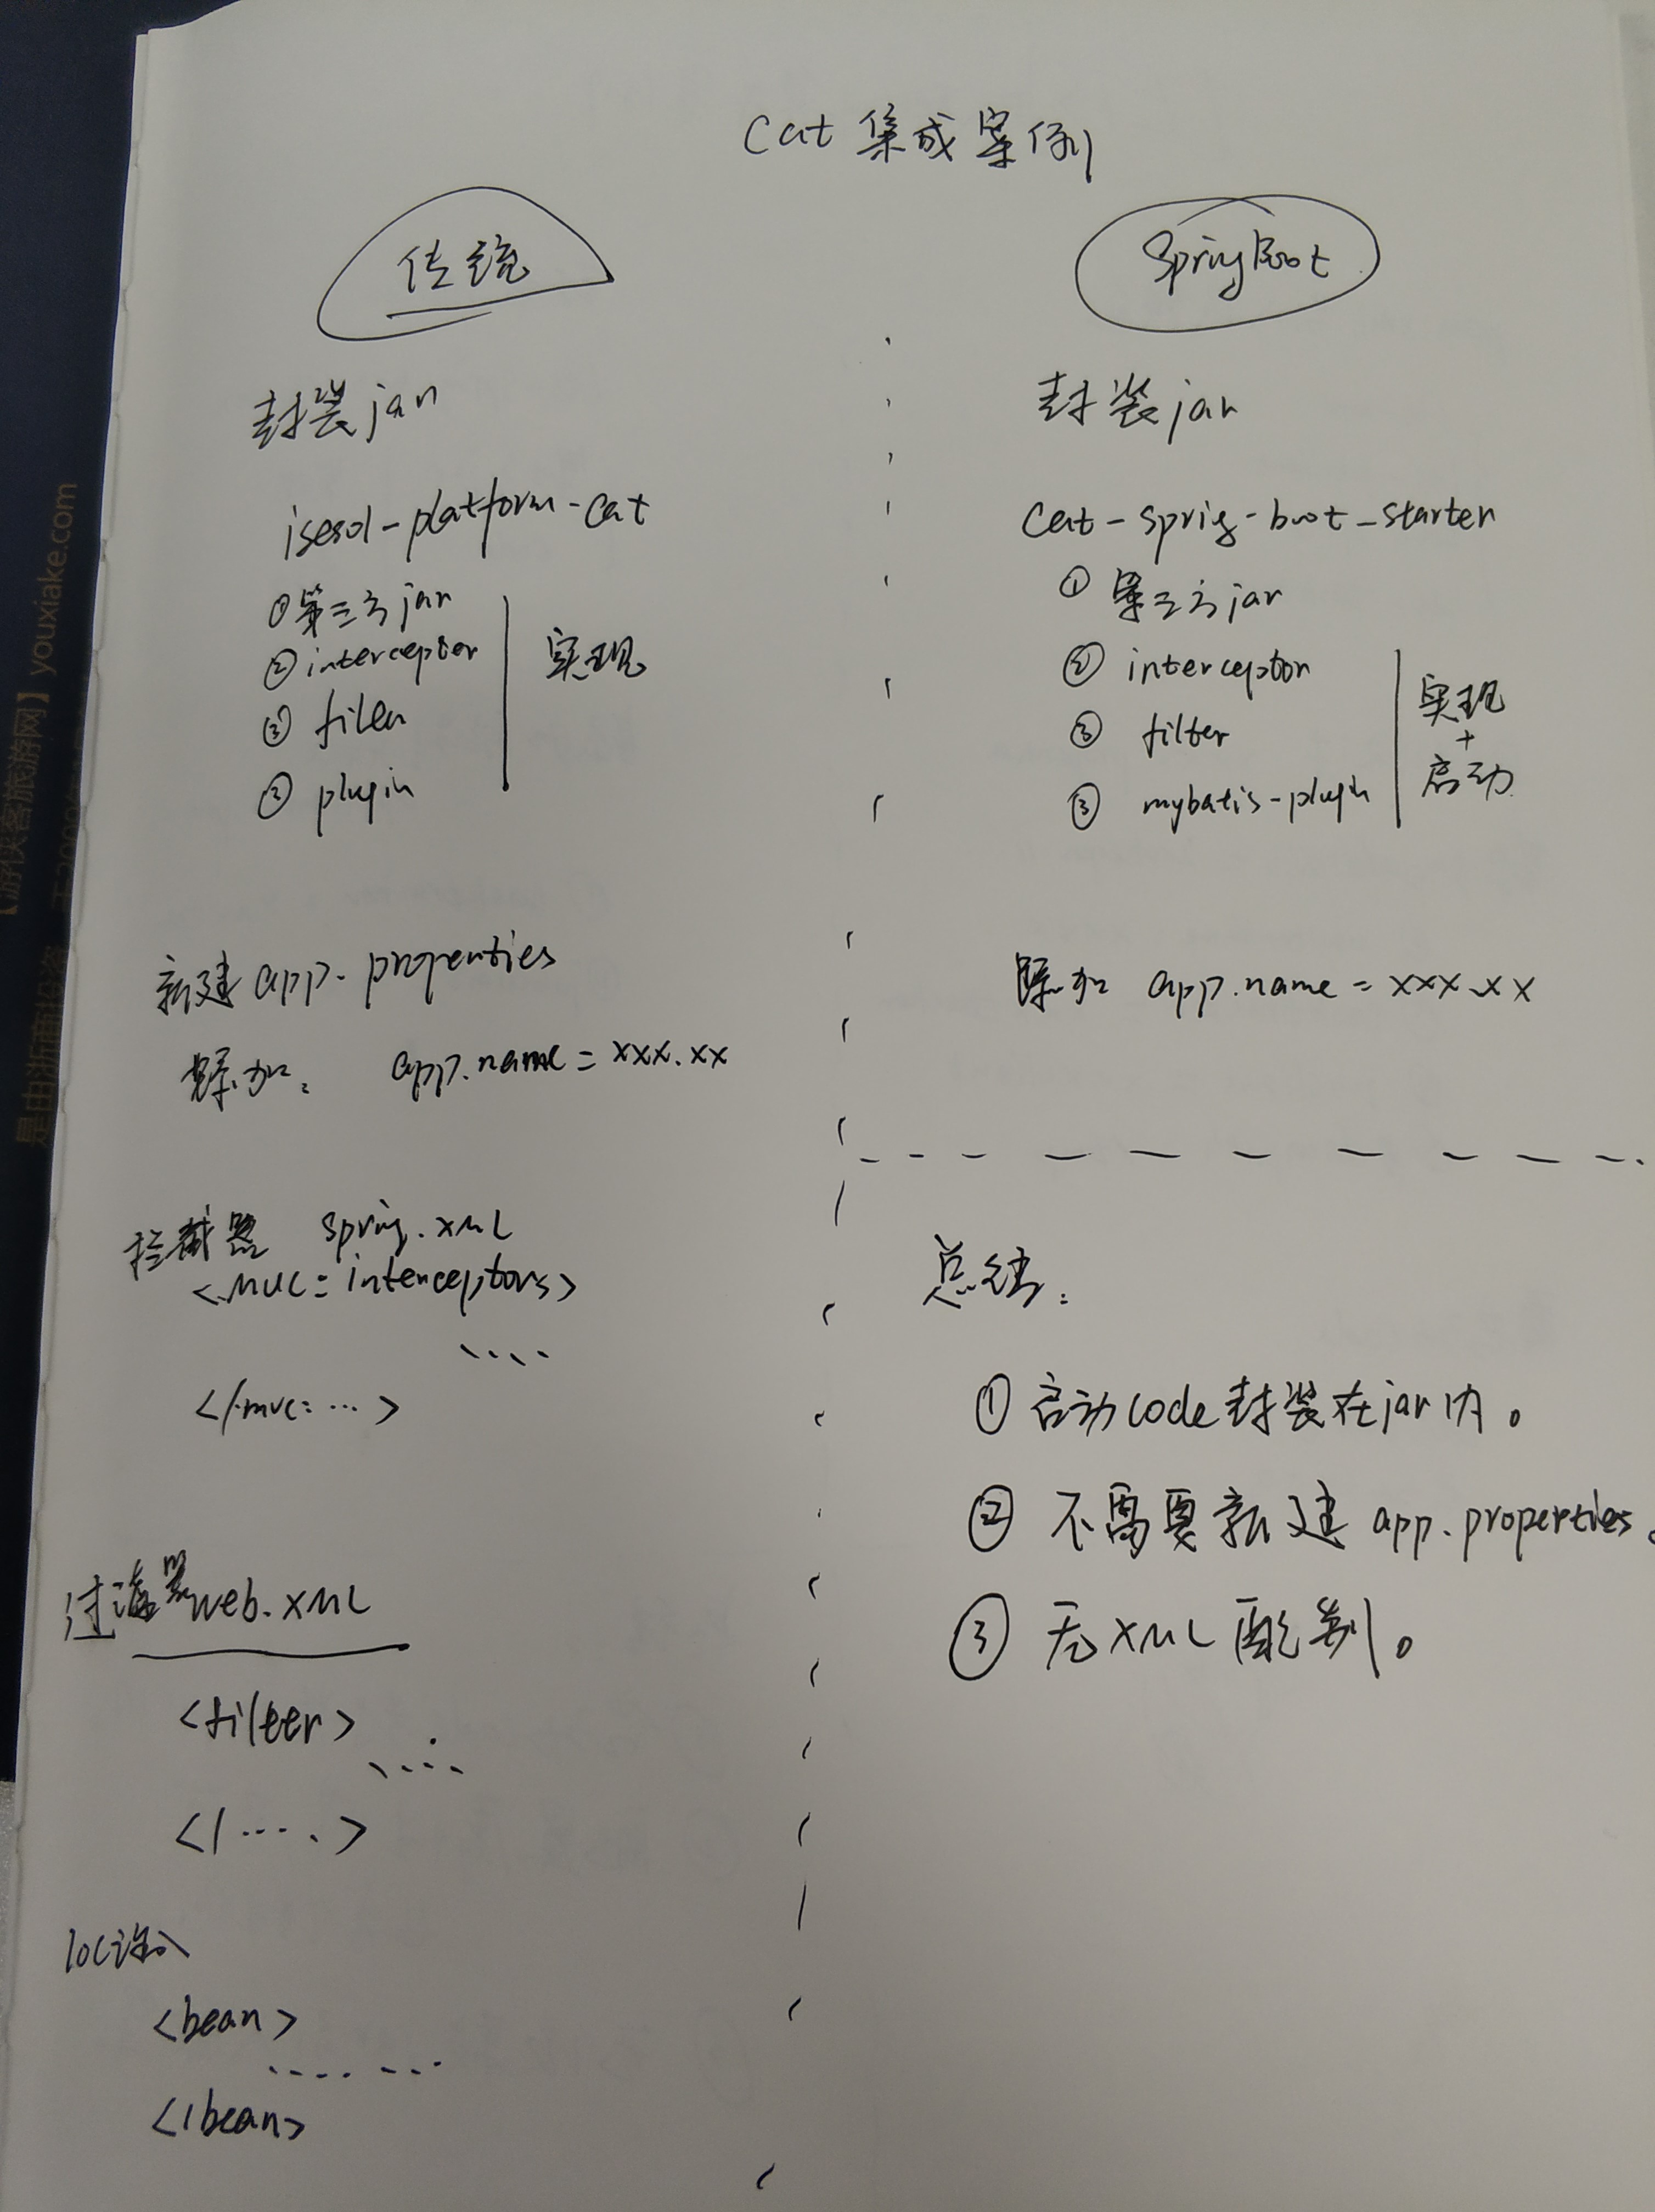
AutoConfiguration思想下我们能干什么?
案例分析
1.中间件CAT
2.中间件LTS
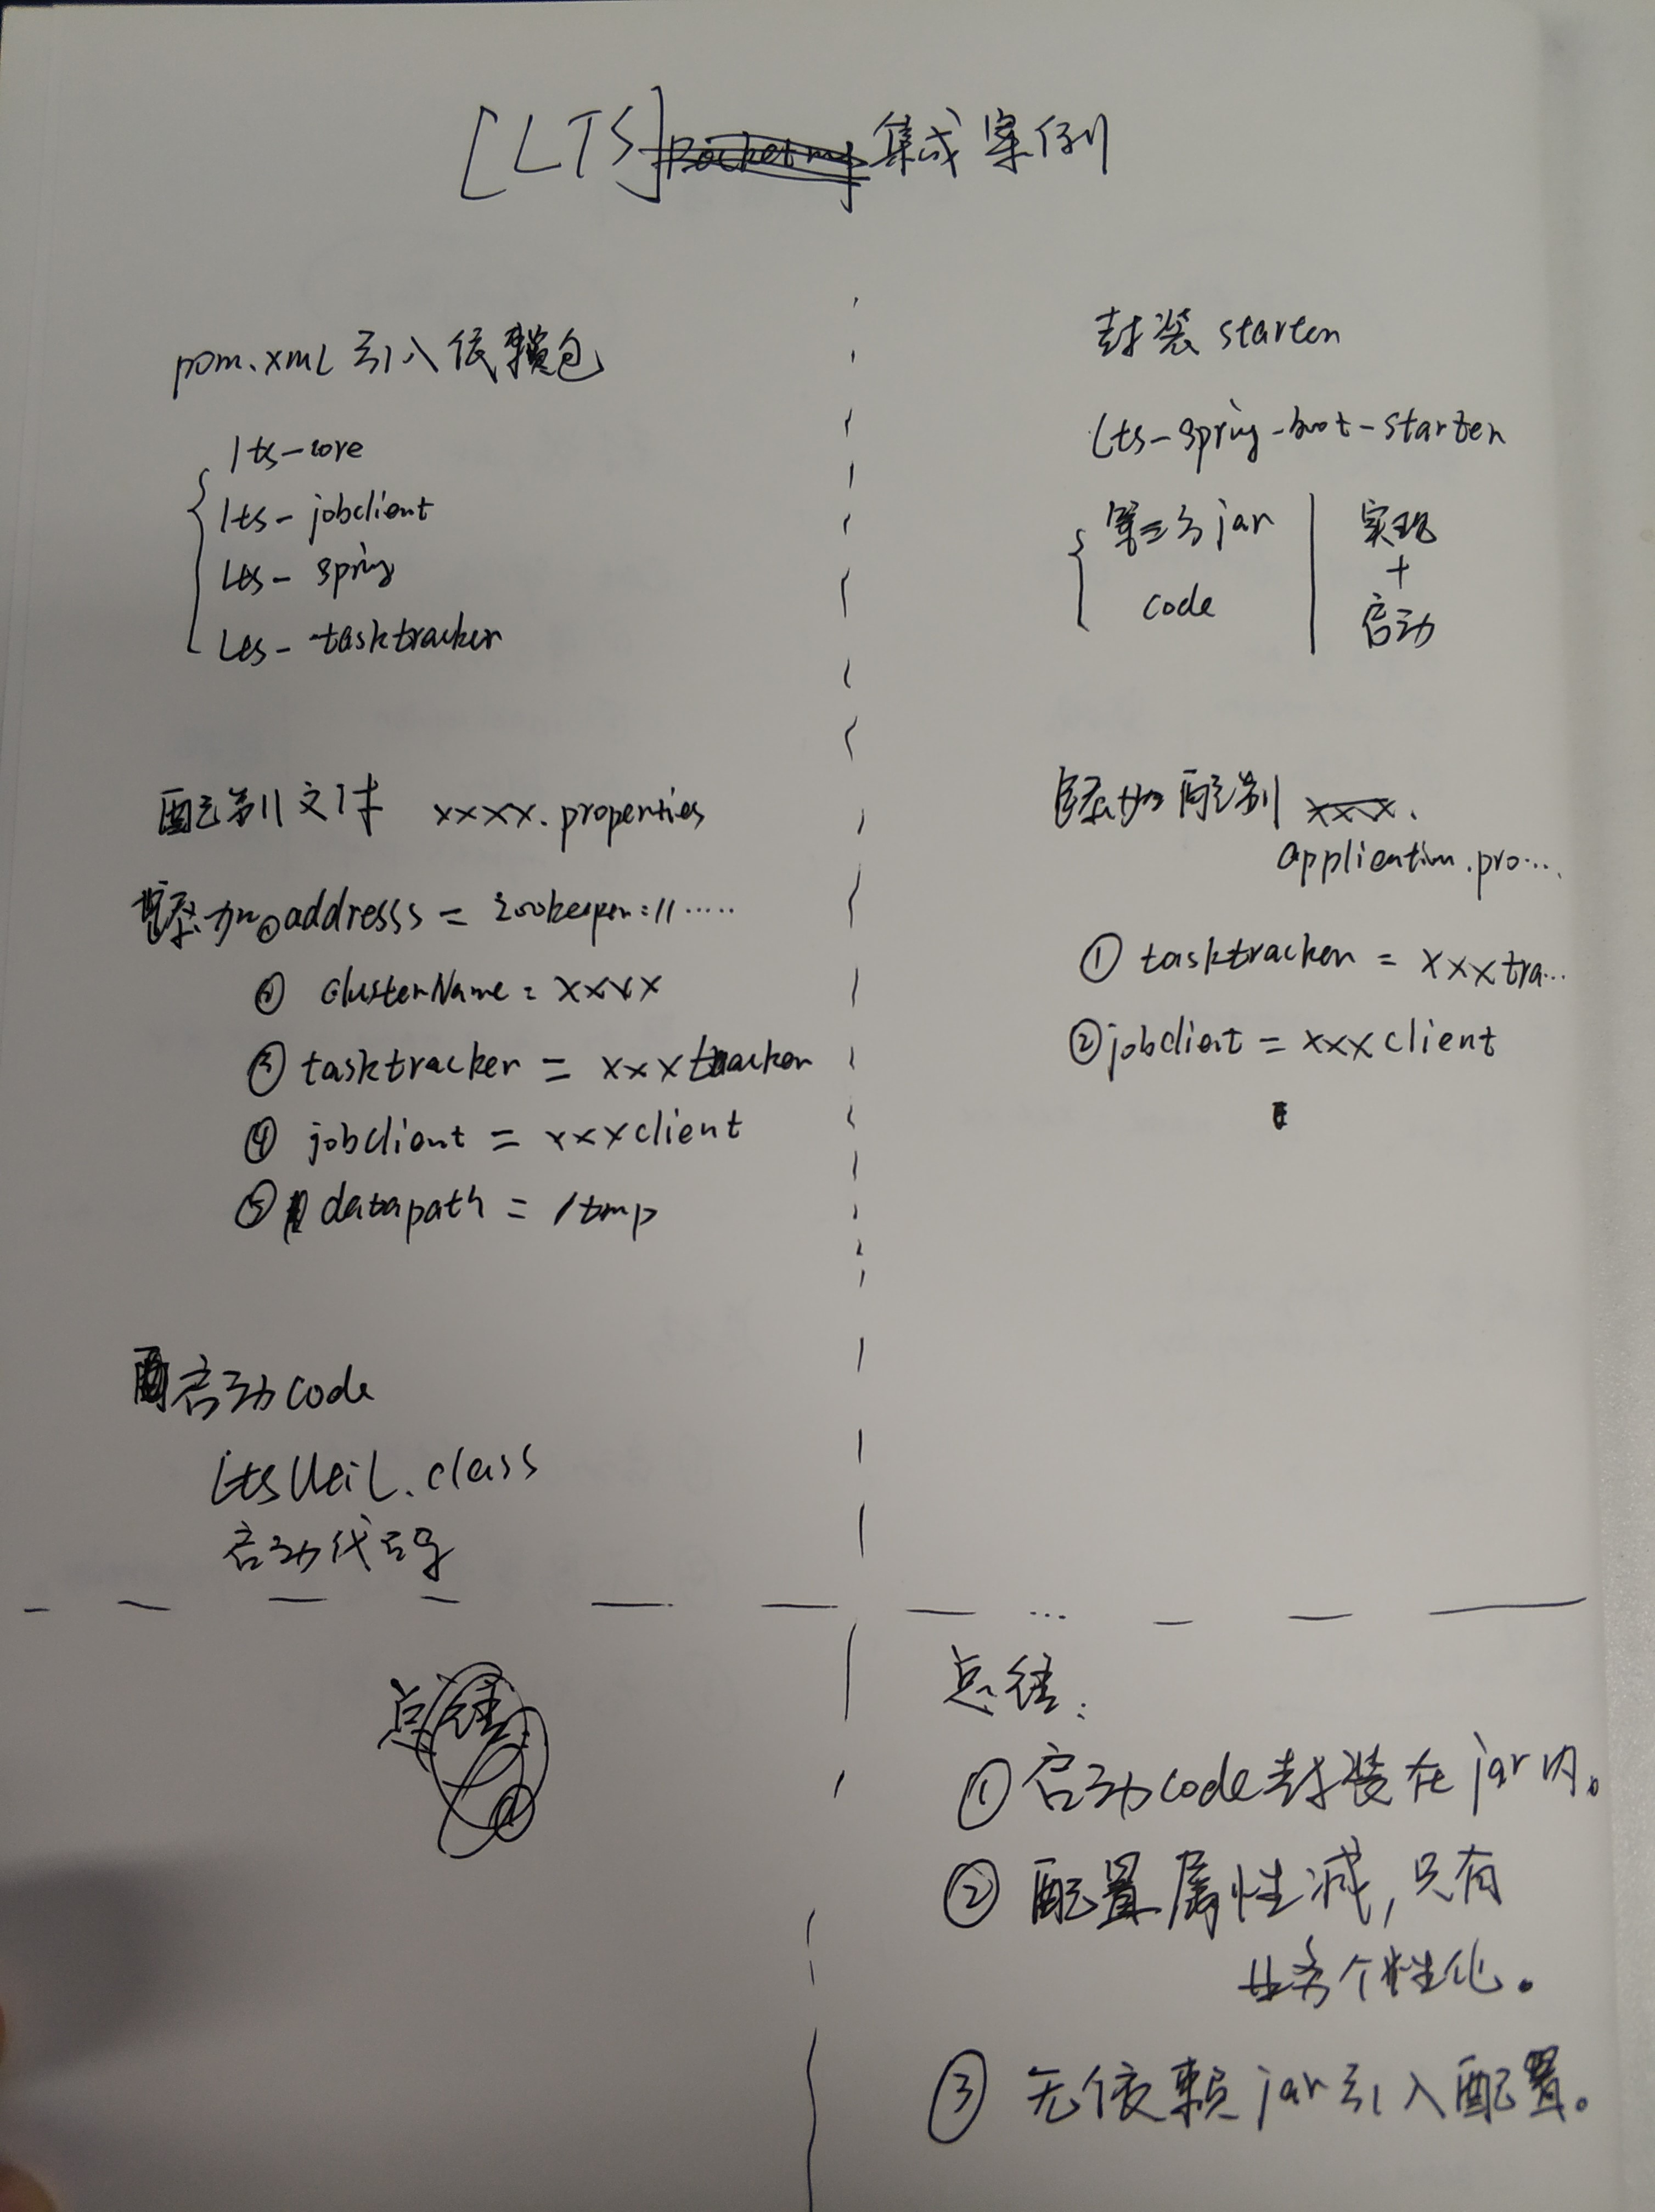
如何构建零配置的组件?
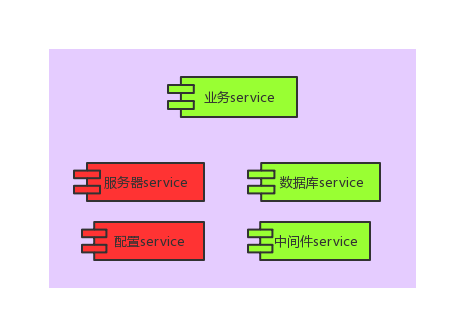
1、服务组件化
服务是由多个组件模块组合产生,不同的组合产生不同的服务。将耦合、组件化。
2、组件零配置化
配置抽象化、默认化、封装一体。
----|||---- 发挥你的想象力和创造力 ----|||----
友情链接
Docs: spring-boot-2.0.6。
Sample: bi-parent | biguava-spring-boot-starter。
作者: Owen Jia,欢迎访问他博客 Owen Blog。
扫描下方二维码收藏文章哦~~~
